Introduction
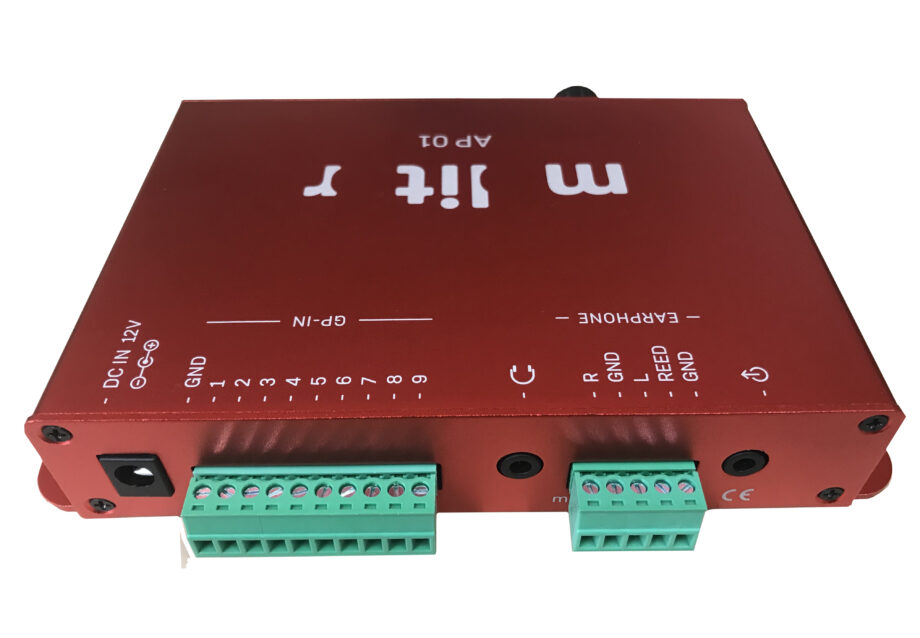
The Molitor AP 01 Media Player plays back audio files in premium quality and boasts practical functionality. Audio files can be saved onto a commercial SDHC memory card or USB stick and then played back on the AP 01. Alongside classic stand-alone use in museums and exhibitions, the AP 01 is suitable for many other uses such as information offices, point of-sale installations or for permanent background music.
Please read these instructions carefully before connecting the audio player and using it. The connection and start-up procedure should only be carried out by qualified personnel.
Features of the AP 01
General Purpose Inputs
The inputs to your AP 01 can come from standard buttons or sensors and require a close contact to trigger the input. When wiring multiple inputs, we suggest wiring a common ground in parallel. This will reduce the amount of wires coming into the ground socket of your GPIO.
Line Output
The 3.5mm Line Output provides a nonadjustable line level signal for connecting to amplifiers and active speakers.
Wiring your VIA or USO
For mono handsets like the VIA and USO, one side of the audio needs to be wired to ground (GND)
Note: If you do not wish to use the auto-start function of your handset, then the yellow and green wires should not be wired into the AP 01.

Programming
The Molitor AP 01 can be setup quickly for commonly used functionality by using one of the included playlist scripts on the SD Card that is provided with your purchase. If you require more unique functionality from your AP 01, you can simply edit the ‘playlist.txt’ using your favourite text editor and follow this guide. When you are ready, simply save and copy your playlist.txt and audio files onto the top level of your SD Card, and insert it into your AP 01 to test.
Player Setup:
This line describes how and if the auto-start function of the AP 01 is to be used.
sw_active=0 Utilise a Normally Open reed contact. (Use this with a Molitor VIA or USO)
sw_active=1 Utilise a Normally Closed reed contact.
Do not include this line if you do not wish to use the auto-start function of your AP 01.

Content number and file association:
[Content0] will play initially when a reed handset has been picked up, or simply when the device has been turned on if no auto-start is being used.
All other [Content#] can then be triggered or played automatically based on how you setup your actions. Associated file names including extension must be the same here as the file name you wish to play. These names and extensions are case sensitive.
Note: The Molitor AP 01 supports .mp3 and .wav files.

Actions and triggers:
All actions and triggers are dependent on which [Content] is currently playing. This lets you use the same triggers for different actions, when different files are playing. Any compatible sensor can be used as a trigger, e.g., a simple button or an IR motion detector.
Common Actions:
JumpX=Y
This will start Content Y when trigger X is received eg. Jump1=4 Change to Content 4 when a trigger on input 1 is received
Pause=X
Pause/Resume the content when trigger X is received eg. Pause=9 Pause when a trigger on input 9 is received
Volume=X
Change the volume of the player to X. The player will remain at this volume until it is manually changed or there is another Content with a different volume level command.
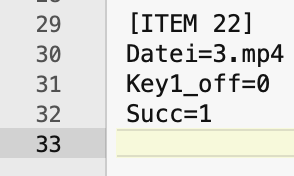
Succ=X
Content X will start playing after the current track has finished playing.
Loop
Content will loop until it receives another command to change Content.
Example Playlists
Using the ‘Auto-Play’ function of a suitable handset like the USO or VIA, the player will start to play once handset is picked up and a button 1-4 is pressed.
Once the track finishes playing it will return to silence. Ensure that you copy across start.jpg as well as the playlist.txt
The Playlist should look like this:
sw_active=0 // by lifting the handset file 000.mp3 will start playing, if you wish not to use a handset with reed, change sw_active=0 to sw_active=1
[Content0]
File=start.jpg // here the image is translated to silence. It can be a welcome .mp3 file before a button is being pressed.
Jump1=1
Jump2=2
Jump3=3
Jump4=4
Loop // we could also use Succ=0, with images is always better to use the Loop command to avoid delays.
[Content1]
File=001.mp3
Jump1=1
Jump2=2
Jump3=3
Jump4=4
Succ=0 // go back to silence once the track is finished [Content0]
[Content2]
File=002.mp3
Jump1=1
Jump2=2
Jump3=3
Jump4=4
Succ=0 // go back to silence once the track is finished [Content0]
[Content3]
File=003.mp3
Jump1=1
Jump2=2
Jump3=3
Jump4=4
Succ=0 // go back to silence once the track is finished [Content0]
[Content4]
File=004.mp3
Jump1=1
Jump2=2
Jump3=3
Jump4=4
Succ=0 // go back to silence once the track is finished [Content0]
// //Ensure there is one empty line at the bottom of your playlist.
2 buttons, 1 for Next the other for Previous track
The Playlist should look like this:
sw_active=0 // by lifting the handset file 000.mp3 will start playing, if you wish not to use a handset with reed, change sw_active=0 to sw_active=1
[Content0]
File=000.mp3
Jump1=1
Jump2=9
Succ=1
[Content1]
File=001.mp3
Jump1=2
Jump2=0
Succ=2
[Content2]
File=002.mp3
Jump1=3
Jump2=1
Succ=3
[Content3]
File=003.mp3
Jump1=4
Jump2=2
Succ=4
[Content4]
File=004.mp3
Jump1=5
Jump2=3
Succ=5
[Content5]
File=005.mp3
Jump1=6
Jump2=4
Succ=6
[Content6]
File=006.mp3
Jump1=7
Jump2=5
Succ=7
[Content7]
File=007.mp3
Jump1=8
Jump2=6
Succ=8
[Content8]
File=008.mp3
Jump1=9
Jump2=7
Succ=9
[Content9]
File=009.mp3
Jump1=0
Jump2=8
Succ=0
//Ensure there is one empty line at the bottom of your playlist.
Content Folders
Sets of audio files can all be played together under one content number via folders. Files will be played back in the order in which they are copied to the folder. This allows for very simple file changing without the need to adjust your playlist. Just add or remove the files from the folder as necessary.
In order to use a content folder, it is done via the file association for content numbers.
Eg. File=foldername/*.*
Saving your Playlist
Ensure there is one empty line at the bottom of your playlist always in your last line
Saving to your SD Card
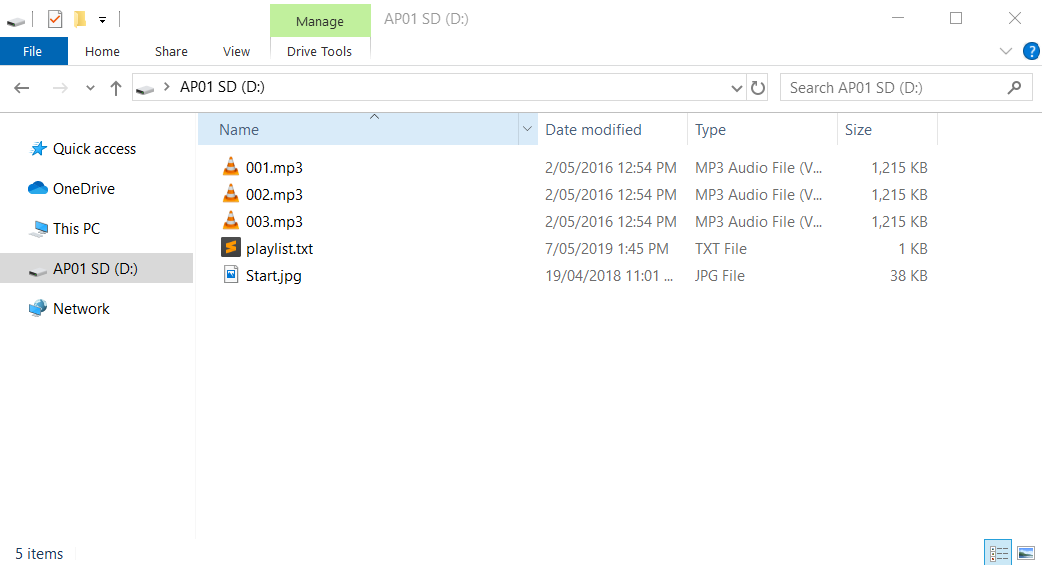
Ensure that all of your media files and playlist.txt file are saved to the top level of your SD Card. Folders will be ignored unless they have been programmed to be read in the playlist.txt file.
Important Note: This should be done on a Windows PC because the Apple operating system will create hidden files that can interfere with the smooth running of your AP 01.
Example Playlist Downloads