Introduction
MP01 media player is designed for continuous interactive video installations in exhibitions, conference and information stands.
The Molitor MP 01 can be set up quickly using one of the preloaded playlist scripts included on the SD card that comes with your device. For custom functionality, simply open the playlist.txt file in your preferred text editor and follow the instructions in this guide to tailor playback to your needs. Once customized, copy both your updated playlist.txt and all audio files to the root directory of your SD card, then insert the card into your MP 01 to activate the new playlist. Most commands and syntax familiar from the AP 01 audio player are also supported by the MP 01, making the transition seamless for experienced users.
Connectivity and Audio/Video Output
The MP01 features user-friendly connections that make integration into various setups simple and flexible:
-
Headphones, buttons, and external sensors can be connected quickly and securely using the built-in Phoenix connector — ideal for installations where plug-and-play reliability is key.
-
The player supports Full HD video output (1920×1080 px) via a standard HDMI port, allowing integration with modern displays and projectors.
Audio Outputs:
The MP01 is equipped with two 3.5 mm stereo line outputs:
-
Fixed Line Out:
Non-adjustable audio signal output — designed for connection to external amplifiers or active speaker systems. -
Amplified Line Out:
Integrated with a built-in amplifier, providing a maximum output of 80 mW, ideal for directly connecting headphones or passive audio components.

MP01 Monitor Player Playlist – In-Depth Guide
A playlist.txt is a customisable text file (playlist.txt) that controls exactly how your MP01 device plays audio and video, and how it reacts to user actions. Here’s what you need to know for effective setup:
1. What Is the Playlist For?
- It’s the instruction set for the MP01, telling it what to play, in which order, and what should happen when buttons or sensors are used.
- It allows for simple, continuous playback or fully interactive, multi-track installations.
2. File Format & Essentials
File name: playlist.txt – plain text, saved as UTF-8.
Location: Place this file in the root (top level) of your SD card or USB stick.
Case sensitivity: File and command names must match exactly (including upper/lowercase).
3. Key Components and Commands
- Auto-start configuration:
The first line controls how playback begins:- sw_active=0 – Player waits for a trigger (e.g., lifting a handset).
- sw_active=1 – Player starts automatically when powered.
- Content blocks:
Each section like [Content 0], [Content 1] defines an individual track or file for playback. - File assignment:
Inside a block, assign a file to play:
Datei=track1.mp3 or Datei=video1.mp4 - Navigation and playback logic:
- Jump1=X – “Next” button plays [Content X]
- Jump2=Y – “Previous” button plays [Content Y]
- Succ=Z – after finishing this track, play [Content Z] automatically
- Loop – repeat this content until a new command is triggered
4. Example Playlist File
sw_active=1

[Content 0]
Datei=track1.mp3
Jump1=1     ; Next button plays Content 1
Jump2=2     ; Previous button plays Content 2
Succ=1      ; Automatically play Content 1 next

[Content 1]
Datei=track2.mp3
Jump1=2
Jump2=0
Succ=2

[Content 2]
Datei=video1.mp4
Jump1=0
Jump2=1
Succ=0
How It Works
- sw_active=1 – Playback starts as soon as the player is powered.
- [Content 0] – Starts with track1.mp3. Use “Next” (Jump1) to go to [Content 1], “Previous” (Jump2) for [Content 2], or let it auto-advance per the Succ command.
- [Content 1] / [Content 2] – Each block sets up its own file, navigation, and what to play next after completion.
- Cycling is possible: Jump and Succ commands can wrap the playlist around indefinitely or progress in a sequence.
Tips & Best Practices
- Begin the file with the right sw_active value for your use case.
- File names in the playlist must exactly match the actual files on your SD card or USB stick.
- Add as many [Content #] sections as you have media files.
- Connect the first and last blocks with Jump and Succ commands for looping or seamless cycling.
- Leave a blank line at the end of your playlist file to avoid playback issues.
- Optionally, add comments after a semicolon (;) to document what each command does (they’ll be ignored by the player).
A clear, well-structured playlist lets your MP01 function exactly as you want, whether that’s looping audio, video, or creating an interactive experience with buttons and sensors. No programming skills are required—just edit the text file as described above!
Using Next and Previous Buttons with the MP01 Playlist
The “Next” and “Previous” buttons allow users to navigate forward and backward through your audio or video tracks in any order you define in your playlist.
This setup is ideal for exhibitions, listening stations, or installations where users can easily explore content using just one or two physical buttons—no touchscreen or advanced interface required.
How It Works
- Your playlist.txt file is organized into numbered sections: [Content 0], [Content 1], [Content 2], and so on.
- Each block defines a specific file (audio or video).
- Jump1 determines which content block to play when the “Next” button is pressed.
Jump2 determines which content plays when the “Previous” button is pressed. - Succ (succession) defines which content should play automatically after the current one finishes—ideal for looping or linear sequences.
- Use sw_active=1 at the top of your playlist to allow immediate autoplay without user interaction.
Use sw_active=0 if you’re using a reed contact (e.g. handset or sensor-triggered start).
Typical Playlist Example
sw_active=1

[Content 0]
Datei=track1.mp3
Jump1=1     ; Next button goes to Content 1
Jump2=2     ; Previous button goes to Content 2
Succ=1      ; Auto-advance to Content 1

[Content 1]
Datei=track2.mp3
Jump1=2
Jump2=0
Succ=2

[Content 2]
Datei=track3.mp3
Jump1=0
Jump2=1
Succ=0
What Happens in This Example
- The player starts with track1.mp3.
- If “Next” is pressed, it jumps to track2.mp3.
- If “Previous” is pressed, it jumps to track3.mp3 (wrapping back from the first block).
- When any track finishes, it continues automatically to the next one, based on the Succ value.
- This navigation logic ensures a smooth, circular sequence through all tracks—ideal for looping content or guided listening.
Tips
- You can add or remove [Content #] blocks to match the number of tracks you want to use.
- Always update the Jump1, Jump2, and Succ values accordingly.
- For seamless looping, make sure your final track loops back to [Content 0].
- This logic works the same way for both audio and video files.
This simple but versatile playlist structure allows for clear, intuitive media control using just a pair of buttons—perfect for museums, exhibitions, educational terminals, and hands-on installations.
Motion Detector Playlist for MP 01
This playlist is designed for use with audio files and works seamlessly with the Molitor MP 01 Audio Player. With small adjustments, it can also work with video files.
If you need to customize this playlist for your installation, refer to the MP 01 user manual for detailed guidance.
How It Works
- The MP 01 stays idle until it receives an input from a motion detector or similar sensor.
- When motion is detected, the player plays a designated audio file (by default: 001.mp3).
- While the audio is playing, further inputs are ignored to ensure the track finishes without interruption.
- After playback, a lockout period is enforced by playing a silent audio file. This prevents the message from retriggering immediately as the visitor moves away.
- You can adjust the lockout duration by replacing the silent file (e.g., silence30s.mp3) with one of a different length, created using free software like Audacity.
Example playlist.txt
sw_active=0           ; Start in standby, wait for input (in this case,
                       the sensor must be connected to the REED GPIn)

[Content 0]
Datei=001.mp3         ; Main audio played on motion detection
Succ=1                ; After audio, go to lockout

[Content 1]
Datei=silence30s.mp3  ; Silent audio for lockout period (e.g., 30 seconds)
Succ=0                ; After lockout, return to waiting state
How this script works:
The player waits for a signal from the motion detector. When triggered, 001.mp3 plays. During and just after playback, new inputs are ignored thanks to a silent track acting as a lockout. Once the silence ends, the player is ready for the next activation.
Examples
The below script works start without any sensor trigger at start and once a button from 1-9 is pressed the accordingly movie is being played.
Also If the GPIO out is connected to LEDs every-time a movie is played the corespondent out sends a command to blink an LED once connected.
External compatible boards can also be connected supplied from the player with 12V which can be used for further connections with perform tasks like turn of lights, motors moving etc…
MP01 player can also support images as .png and .jpg in combination with video files.
A lot of times static menus can be created once a player is switched on before navigating through the content video/images files.
Serial Control via RS-232
The MP 01 can be controlled through the Mini USB socket via serial commands.
Baud Rate 9600/ Data Bits 8/ Stop Bits 1
Please use the following parameters when you use the RS-232 Serial Port:
| @00:0$ | Jump to [Content0] on the Playlist and play this content |
| @00:1$ | Jump to [Content1] on the Playlist and play this content |
| @00:2$ | Jump to [Content2] on the Playlist and play this content |
| @00:mute$ | Mute / Unmute |
| @00:vol+$ | Volume + |
| @00:vol-$ | Volume – |
| @00:fwd$ | Jump to next content |
| @00:pause$ | Pause |
| @00:next$ | Jump to next content |
| @00:prev$ | Jump to previous content |
| @00:power$ | Turn off the system |
Echo returns:
| @0:AOK | Received after every input |
| @0:END00 | [Content0] Completed |
| @0:END01 | [Content1] Completed |
Slideshows
A folder of pictures can be set together to form a slideshow. Playback can be adjusted with these commands.
Slidetime=X Display each image for X seconds
Transition=X Defines the transition mode from one image to the next
| Transition = 0 | no transition |
| Transition = 1 | random |
| Transition = 2 | divides the image into 20 squares |
| Transition = 3 | cross fade from bottom |
| Transition = 4 | slide from bottom |
| Transition = 5 | cross fade from the centre outwards |
| Transition = 6 | squeezes from bottom/top/left/right |
| Transition = 7 | pixel |
| Transition = 8 | fade in / fade out |
| Transition = 9 | Ken Burns effect |
| Transition = 10 | cross fade |
Supported Formats
Ensure that all of your media files and playlist.txt file are saved to the top level of your SD Card. Folders will be ignored unless they have been programmed to be read in the playlist.txt file.
Important Note: This should be done on a Windows PC because the Apple operating system will create hidden files that can interfere with the smooth running of your AP 01. In case using mac perform a clean eject of the sd_card to make sure you delete all hidden files.
Supported SDHC formats:
FAT, FAT 32, NTFS
Supported audio format:
(max bitrate: 30 Mbit/s) .mp4, .mov, wmv
Important Note:The mac OS operating system will create hidden files that can interfere with the smooth running of your AP 01. In that case make sure you make a “clean eject” of the sd-card, so no hidden files will be created.
GPIO – General Purpose Inputs Outputs
2 pin – 12 V out (Phoenix plug )
10-pin out port (Phoenix plug),
HDMI output
The inputs to your MP 01 can come from standard buttons or sensors and require a close contact to trigger the input. When wiring multiple inputs, we suggest wiring a common ground in parallel. This will reduce the amount of wires coming into the ground socket of your GPIO.
Via the 10-pin out port and the 2 pin – 12 V out (Phoenix plug ), an external board can be connected, providing more possibilities for connecting extra sensors and Electronics solutions.
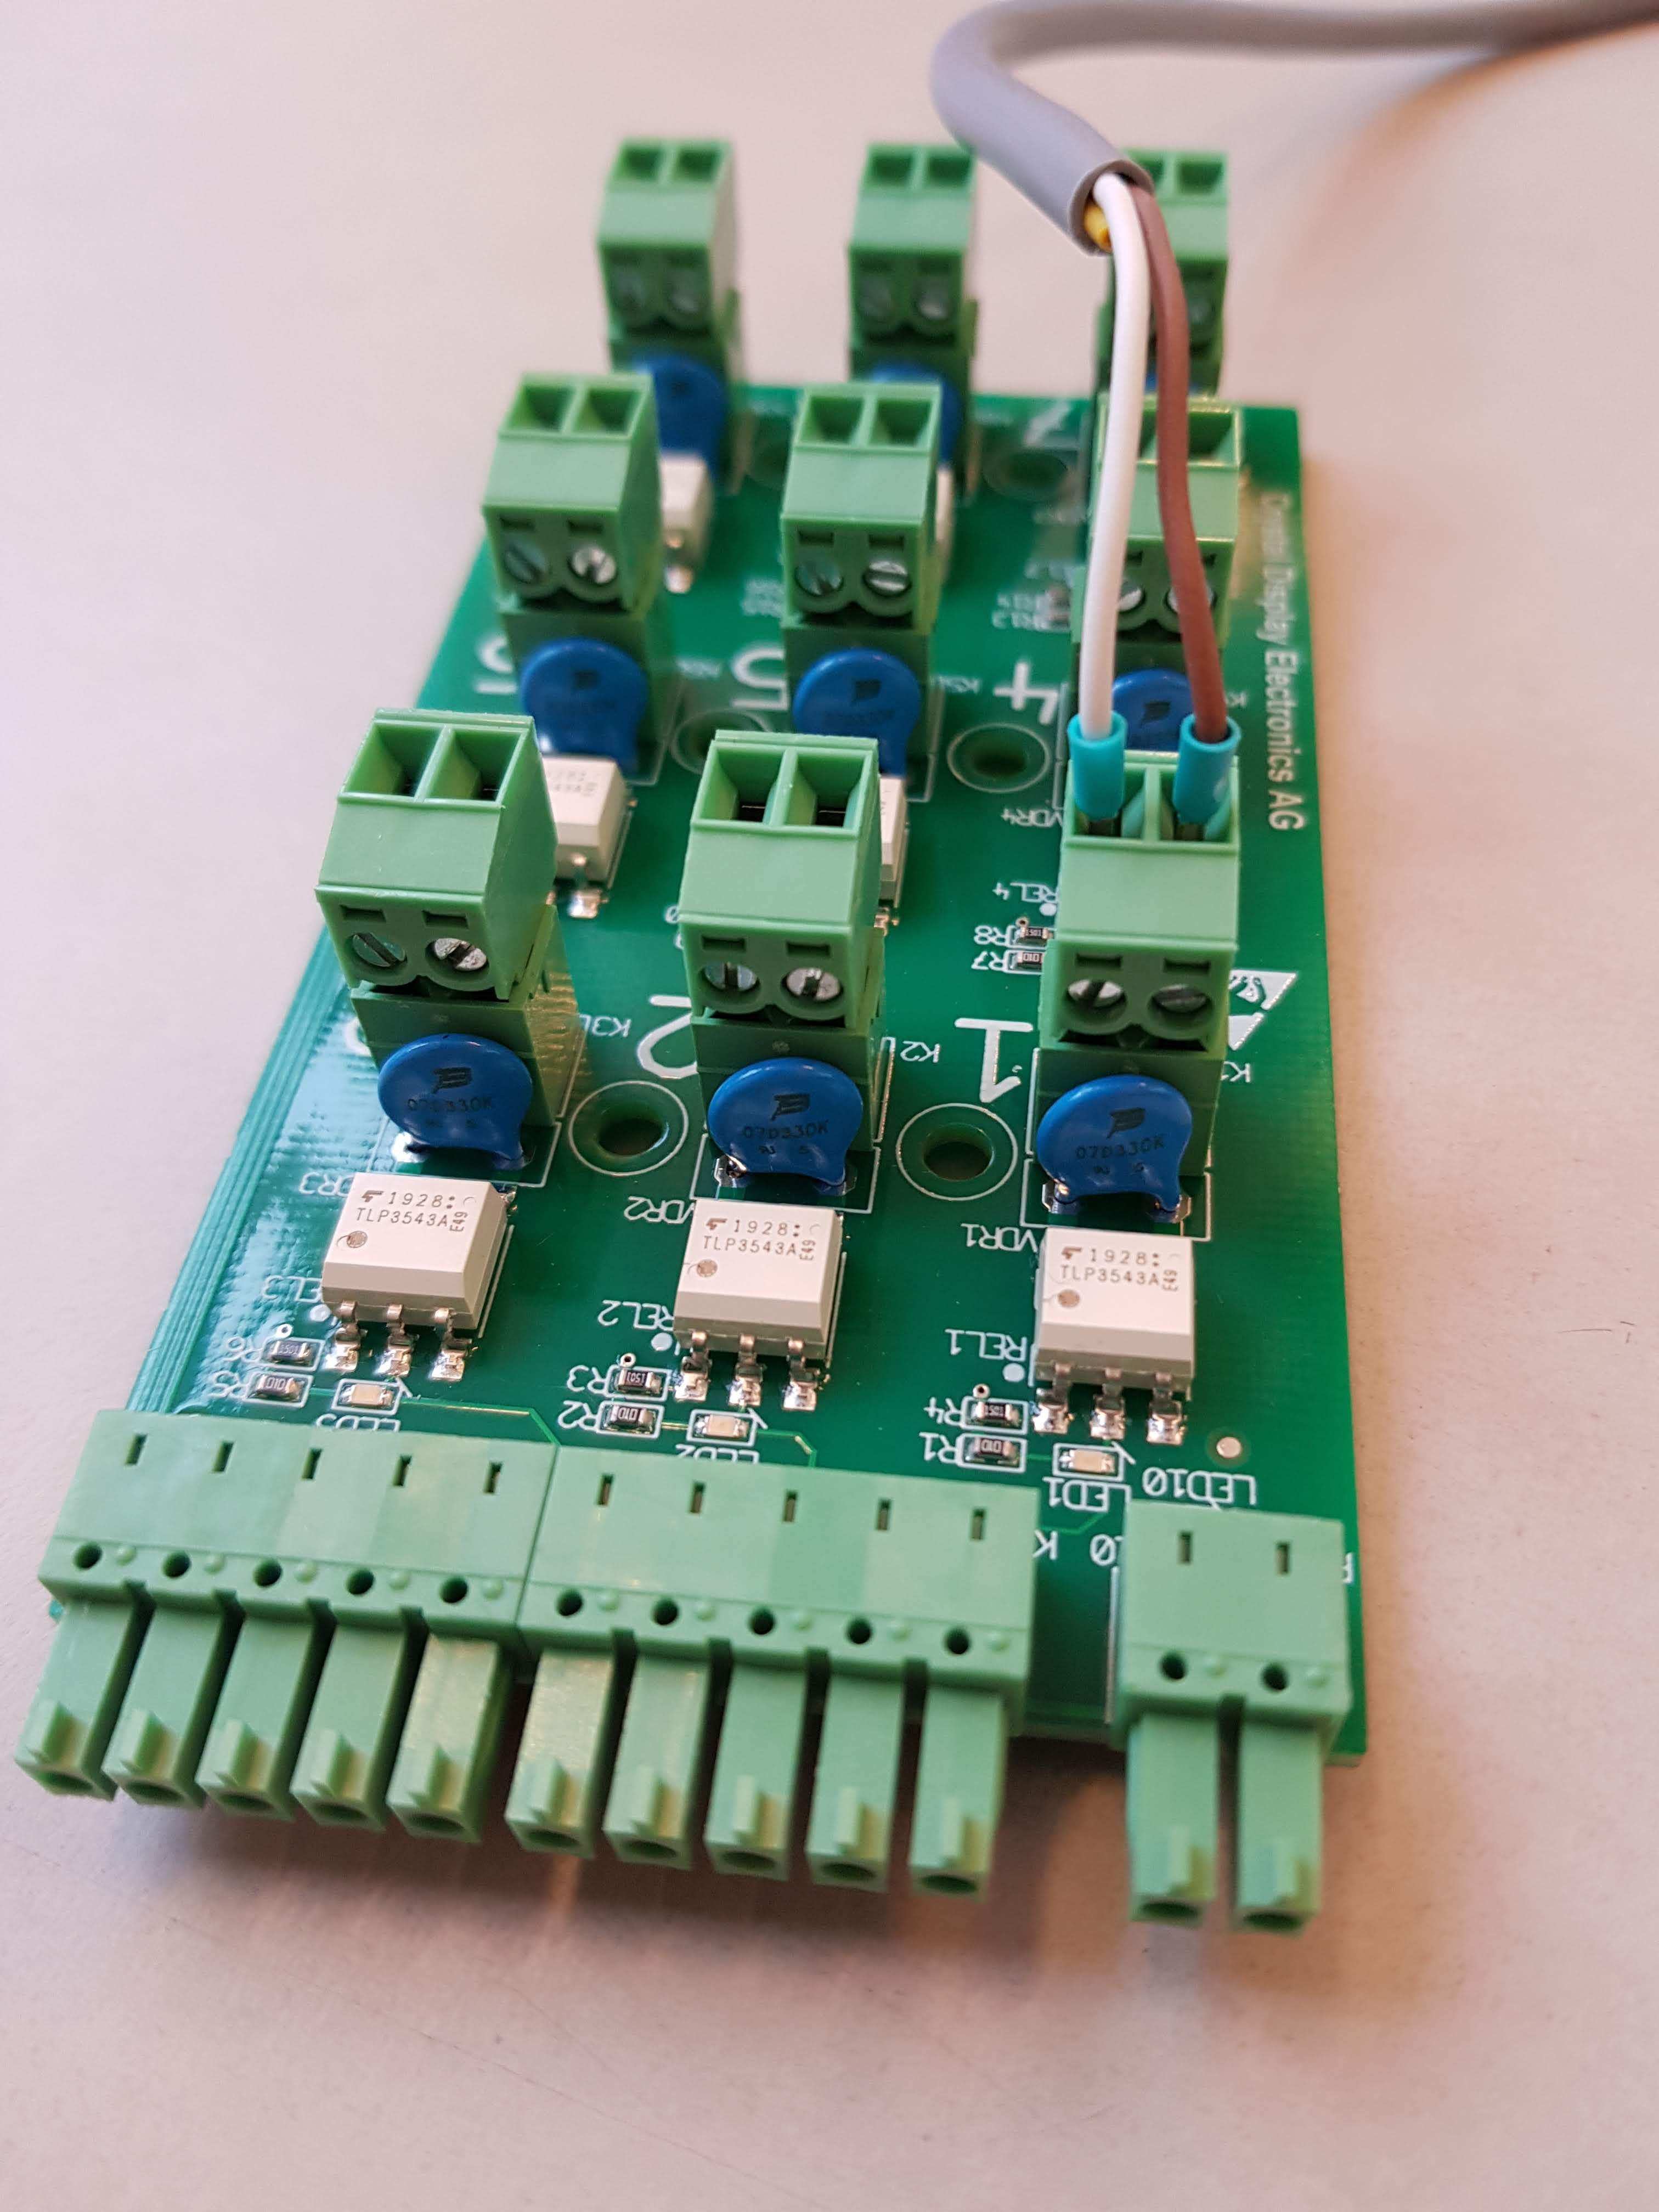
MP 01 Extension Board
This external switch board extends the application possibilities of your MP 01 Media Player. It connects easily to the 12V GPIO Outputs of your MP 01 and provides up to 9 potential-free programmable switches. This allows you to connect and control larger external loads such as low-voltage lighting, motors and other circuits. The switches are optically driven and so there are no mechanical parts to wear out.
Important Note: The MP 01 Extension Board has been specifically designed to fit the MP 01. As such it is not compatible with other players.
Connection and Usage
The Extension Board plugs directly into the permanent 12V DC output and the GP-Output Phoenix connectors of your MP 01.
It is supplied automatically with the correct operating voltage and switching signals from the player. The 9 independent switching outputs are controlled via the GP-Out of the player and the programming of the playlist remains the same. The switched outputs can support potential-free voltages of up to 30V and currents up to 3A.
The 9×2-Pole phoenix connectors of the switchable outputs can be removed to help ease wiring.

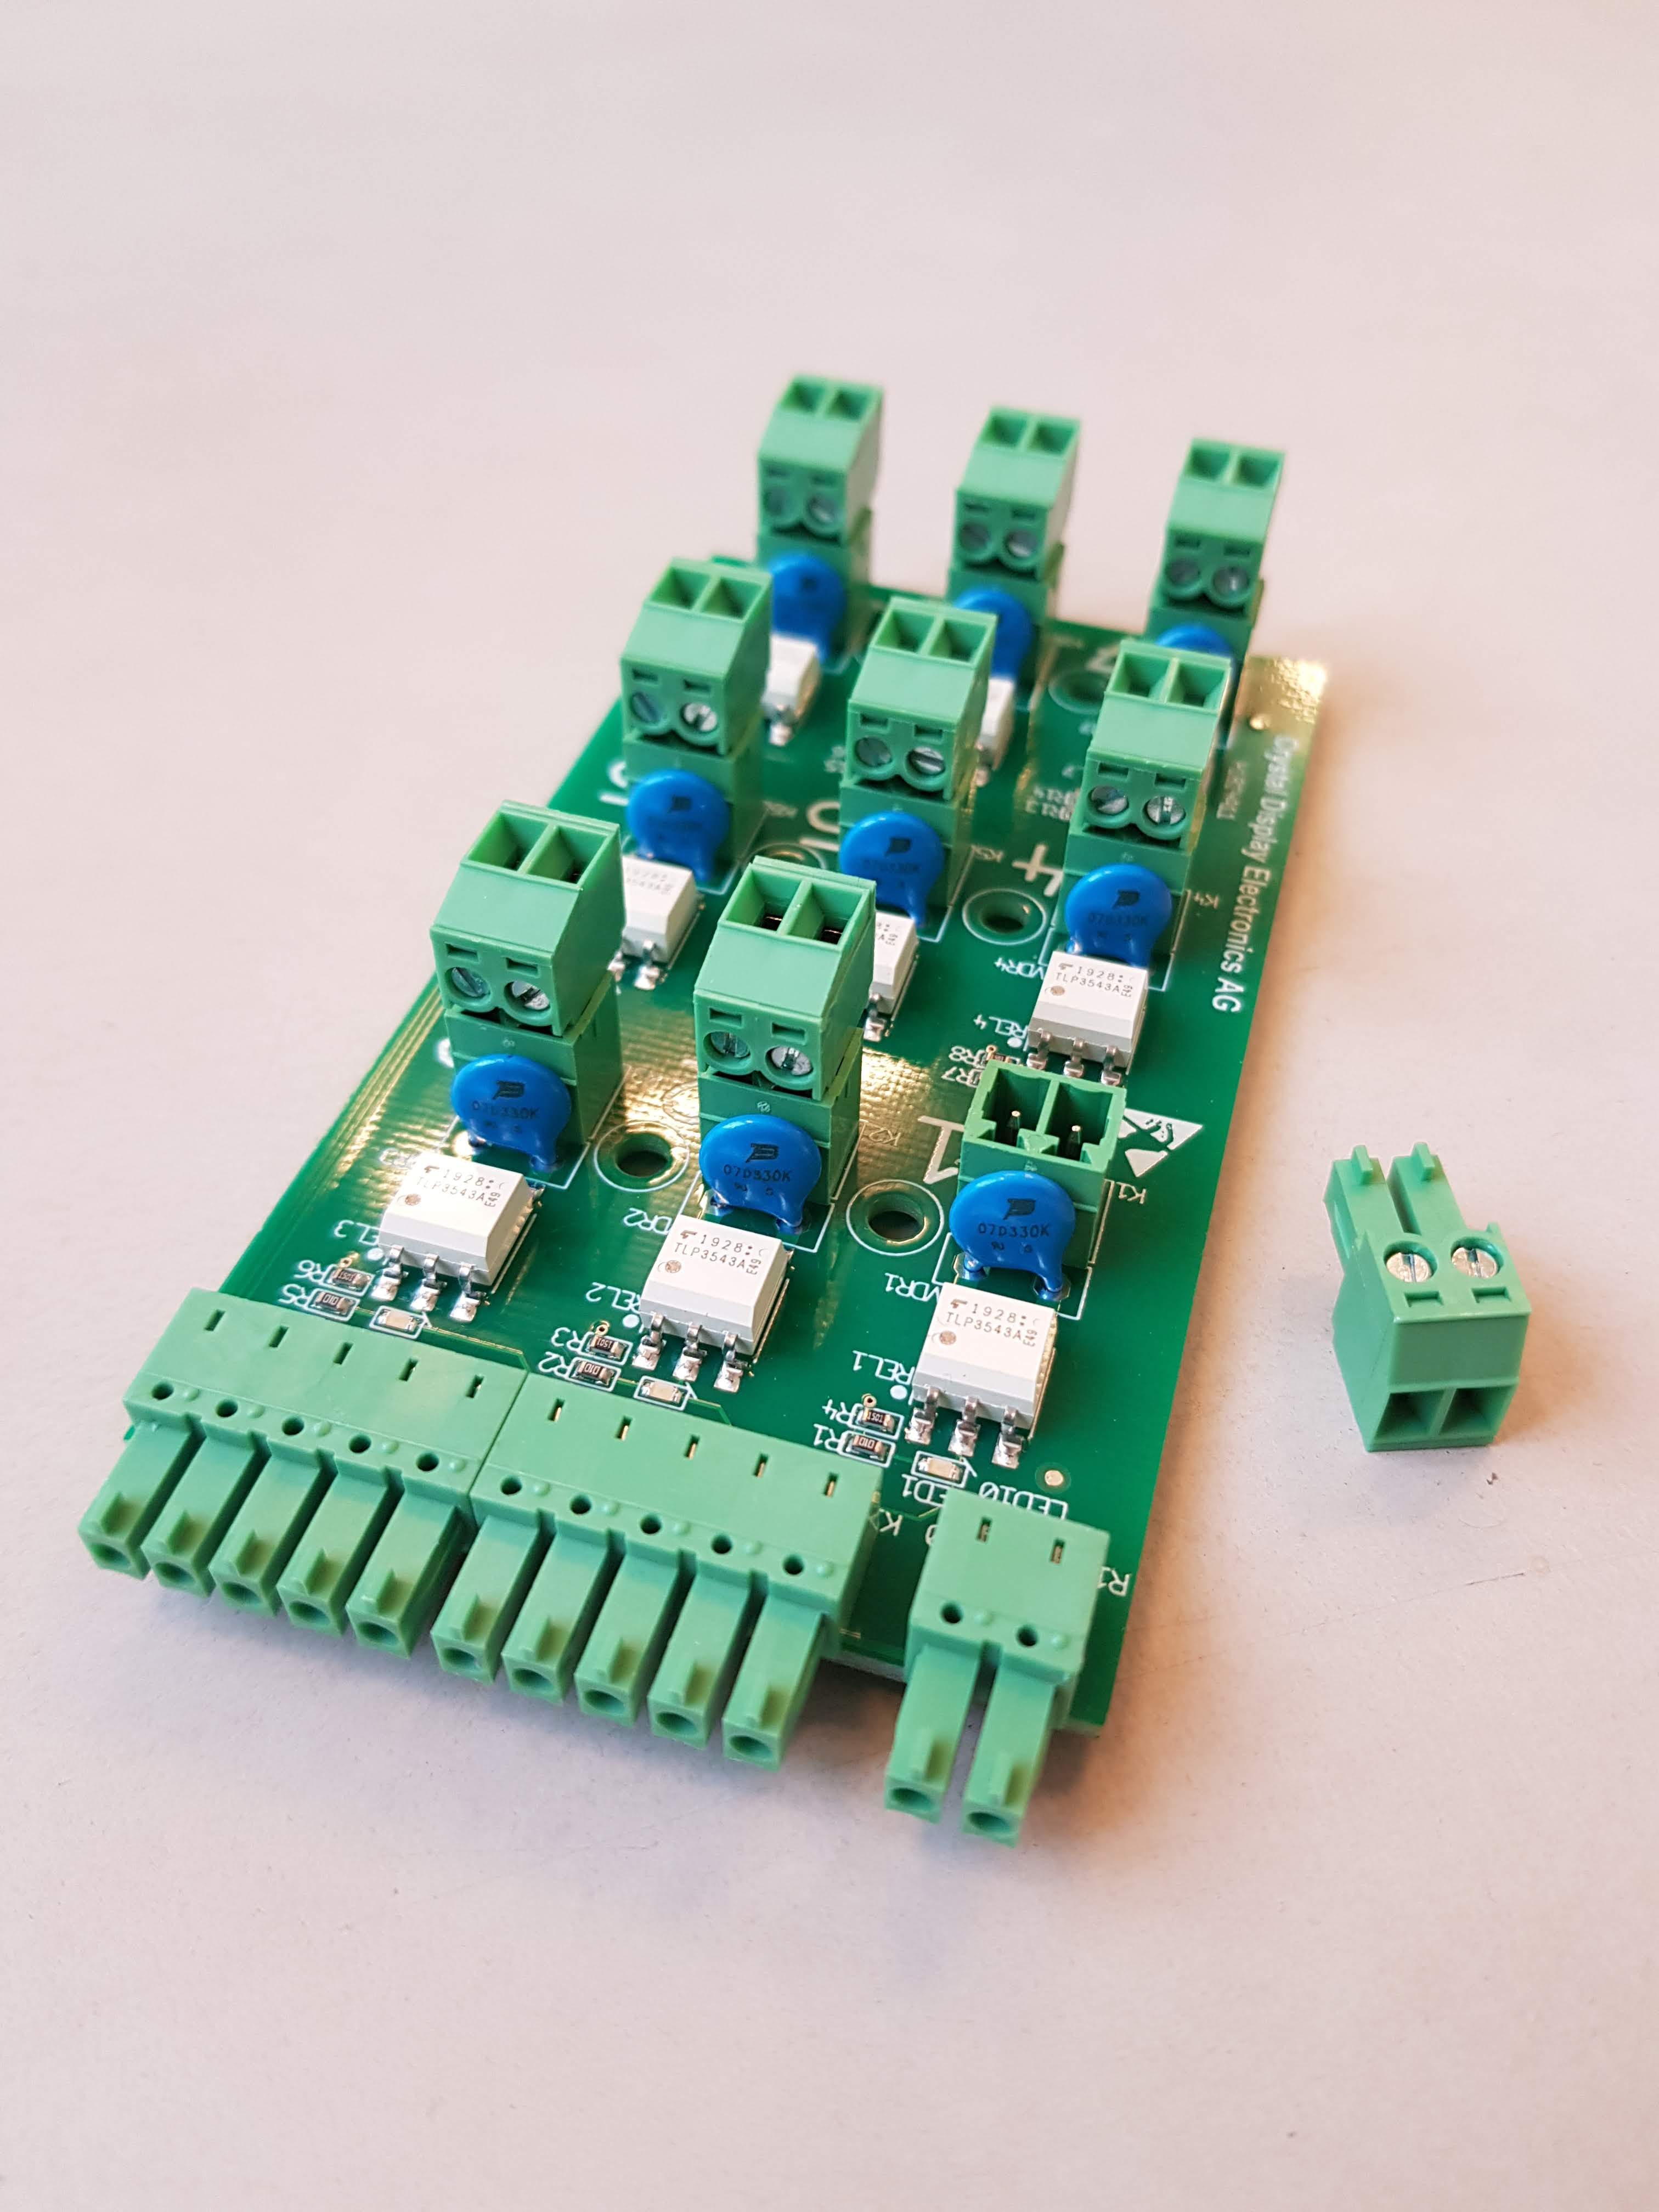
Technical Data
| Power Supply | 12V DC |
| Power Consumption | 550 mA |
| Max. voltage per switched output | 30 V AC or DC |
| Max. current per switched output | 3A |
| Outputs | 9 × potential-free (Phoenix, 2-pole) |
| Inputs | 10-Pin (Phoenix), 2-Pin Power Supply (Phoenix) |