Molitor 4K Light – Technical Specifications
Supported File Formats
- Video: MP4, MOV, AVI, etc. (up to UltraHD with optional license)
- Images: JPG, PNG, BMP
- Audio: MP3, WAV, AAC
Storage Options
- MicroSD card: FAT32, exFAT, NTFS supported
- USB storage: FAT32, exFAT, NTFS supported
Outputs & Connections
- Video Output: HDMI 2.0 (automatic resolution detection & manual settings, up to 4K), AV output (3.5mm, analog video + stereo audio)
- Audio Output: HDMI, SPDIF (optical, digital), 3.5mm jack (analog stereo)
- Network: Gigabit Ethernet (LAN, DHCP/static IP), WiFi (WPA2/WEP/Open)
- Additional Connections: USB 3.0, USB 2.0, microSD slot
- DMX/ArtNet: Lighting control via DMX/ArtNet interface supported
Control Methods
- Remote control: included; multiple button layouts supported
- USB peripherals: mouse, keyboard, touchscreen, presenter, RFID reader, IO board for custom control
- Web interface: management via browser and device IP address
Power Supply
- Power adapter: 5V DC (included)
Features
- Automatic playback: Plays media in alphanumeric order or by playlist
- Synchronization: Multiple devices can be grouped for frame-accurate playback in video wall operation
- Playlist features: Custom sequences, timed playback, loops and automations
Additional Features
- FTP server: Access storage via FTP (default port 2221; user/password configurable)
- Timecode automation: Trigger actions (UDP, relay, DMX, etc.) at specific clip times via .sze files
- Content updates: manual and timed via FTP
- Firmware updates: can be loaded via microSD or USB
Physical Overview
- Front: status LEDs, clock, symbols for network/USB/status
- Rear: antenna, AV-Out, LAN port, HDMI, SPDIF, power connector
- Side: USB 2.0/3.0 ports, microSD slot
Dimensions & Operation
- 109 mm x 109 mm x 18 mm
- Typical use: 24/7 operation with robust support for files and automation for professional AV environments
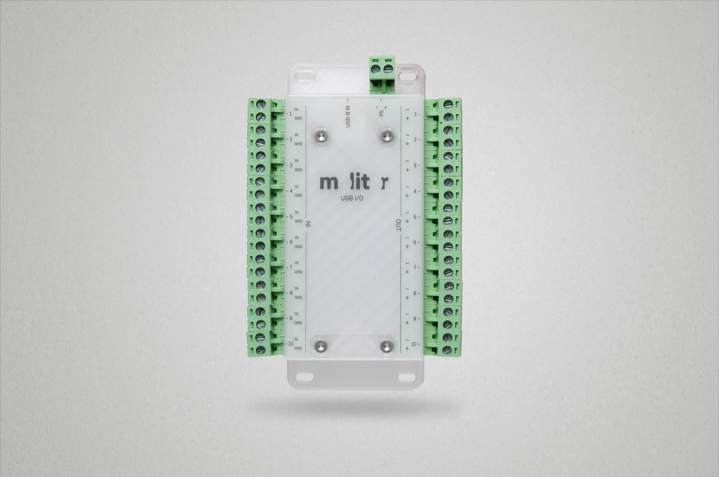
USB IO-Board
As no integrated GPIO is available, the USB I/O Board can extend the functions of the Mediaplayer 4K Light.It can be easily connected via USB (Type A to Type B) and automatically supports 10 inputs and 10 outputs. It is suitable for connecting buttons, LED ring buttons, relays or other potential-free contacts. Since the Mediaplayer 4K Light has no integrated I/O ports, this board serves as an additional extension.
The inputs are labeled “IN1” to “IN10”. Contact is triggered by an external short between the IN pin and the corresponding GND pin outside the board. After connection, the inputs must be configured as usual in the playlist script. By default, ITEM 1–9 triggers contacts 1–9: Contact 1 → ITEM 1, Contact 2 → ITEM 2.
The board also provides a power output for LEDs or relays. Recommended power is up to 2–3 W per channel as a short pulse. If needed, multiple boards can be chained together.
The device may occasionally become warm during operation. The higher the load, the more heat is generated.
Example with a Molitor VIA/USO handset:
Programming
The file PLAYLIST.txt for CF Player®Light is a customizable text file that controls the order, timing, and interactive behaviors of media playback. It offers significantly more control than simple alphabetical playback.
Structure and Basic Function
- Each media item starts with a header like [ITEM 0], [ITEM 1], etc.
- Under each header, the filename is specified:
Datei=Dateiname.ext(e.g. Datei=Video1.mp4) - Indices start at 0; the order in the PLAYLIST defines the playback sequence.
Important Parameters:
- Displaytime=seconds: Duration for images/HTML display (default: 5 sec.; -1 = endless loop until interruption)
- Loop=#: Number of repetitions (-1 for infinite)
- Succ=#: Next point after playback (enables non-linear sequences)
- ZufallSucc=1,2,3: Random next entry from the list
- Volume=0-10: Volume for the respective entry
- Orientation=landscape/portrait: Display orientation for this entry
Control & Automation Functions
Timecode Actions
- Commands can be bound to times in videos:
@ 00:00:05.000 > DMX_Set 1:255
(e.g. set DMX channel 1 to value 255 at second 5) - UDP/network/relay/DMX commands can be triggered by timecode or item start.
Touch & Interaction
- Define interactive areas via X/Y/W/H coordinates:
X=100, Y=92, W=566, H=878, M=1, PLAY 1
(If the user touches this area, the player jumps to item 1)
HTML5 and Web Content
- HTML=Filename.html: Integrate web content as a playlist item
- Additional options:
- Whitelist/blacklist for allowed web domains
- HTMLTimeout, Inactive for session control
Advanced Usage
Calendar & Time Control: Items can be limited to certain dates, times, or days of the week.
Synchronization of Multiple Molitor 4K Light Devices
1. Network Requirements
- Same network: All devices to be synchronized must be in the same LAN/WLAN.
- UDP port: All devices must use the same UDP port (default: 4950) for correct communication.
2. Device Types and Groups
- Master & Slave mode:
- Master: One device sends synchronization signals.
- Slaves: Other devices follow master commands.
- Groups: Devices can be organized into up to 10 independent sync groups.
3. Playlist Synchronization
- Item numbers: All devices must have the same number and indices in their playlists, even if filenames differ.
- Media consistency: For best results, videos should have identical length, frame rate, and start/end points.
4. Configuration Steps
- Connect all devices to the same network (LAN is recommended).
- Set UDP port uniformly on all devices.
- Configure synchronization:
- Define one device as master, others as slaves.
- Assign all devices to the same sync group.
- Select synchronization accuracy (minimal to high).
- Upload and coordinate playlists on all devices.
5. Synchronization Accuracy
- Minimal: Synchronization only at video start.
- High: Millisecond-accurate synchronization, possibly audible resync artifacts on audio with multiple devices.
- Recommendation: Minimal/medium for video walls, high only if needed.
6. Operation
- Start playlist on master; slaves follow automatically and frame-accurately.
- Devices connected later are synchronized to the current point in time.
Example Scenario
| Player | [ITEM 0] | [ITEM 1] |
|---|---|---|
| Master (left) | Film1_left.mp4 | Film2_left.mp4 |
| Slave (center) | Film1_center.mp4 | Film2_center.mp4 |
| Slave (right) | Film1_right.mp4 | Film2_right.mp4 |
Important Notes
- Configurations (master/slave, group, UDP port) can be set via setup menu or web interface.
- Playlists must be identical in order and number of items.
- Synchronization works for any number of devices, depending on network quality.
Molitor 4K Light – Compatibility with Nexmosphere XY Series
The Molitor 4K Light player is compatible with a variety of Nexmosphere sensors (XY‑240, XY‑241, XY‑320) including nano controllers (XN‑115 and XN‑135). This enables highly interactive, sensor-based digital signage and touchscreen setups.
Getting Started with Configuration
- Set USB input to Nexmosphere
- Open the player’s setup menu before connecting the Nexmosphere controller.
- Go to the area for USB device configuration or “USB type”.
- Change USB input from the default (e.g. IO board, keyboard or off) to “Nexmosphere”.
- Save your settings.
This ensures the player correctly recognizes and communicates with Nexmosphere modules (sensors and controllers).
- Connect Nexmosphere hardware
- Connect the Nexmosphere sensor or controller (e.g. XY‑240 sensor with XN‑115 nano controller) to a USB port of the Molitor 4K Light.
- Integration in the playlist
Playback and automation can be controlled via Nexmosphere sensor events using playlist commands. Sensor events can be directly referenced in PLAYLIST.txt.
Example for a playlist.txt with Nexmosphere control:
[ITEM 0]
Datei=1.mp4
Nexmosphere X001B[Dz=AB] PLAY 1
Loop=-1
[ITEM 1]
Datei=2.mp4
Nexmosphere X001B[Dz=XX] PLAY 0
Loop=-1
Explanation: The player responds to Nexmosphere signal events from sensors (via nano controllers) and switches playback accordingly – this enables contactless, sensor-driven control.
Application Examples
- Interactive content switching by gesture, RFID or proximity
- Presence detection for targeted content activation
- Automated video loops or transitions triggered by real events
Further Interactivity
By integrating modular Nexmosphere sensors (XY‑series) with nano controllers (XN‑series) and Molitor media players, extensive and sophisticated interaction possibilities arise. Sensor signals can be used to control volume (including smooth fade-ins and fade-outs), influence video transparency or respond to a wide variety of inputs. This flexible combination opens up numerous uses where presence, gestures or physical actions influence audio and video playback – ideal for museums, retail and immersive installations.
Below is an example illustrating this compatibility.
Notes
- Always keep player and Nexmosphere sensor/controller firmware up to date.
- For full integration, refer to the USB type/external modules and playlist automation sections in the manual.
- Advanced commands and automations can also be controlled via the web interface.